What is the goal?
In this article, I will review how to create a custom RecyclerView, how to fetch the data from the external API using Retrofit, and display the result in the RecyclerView. This tutorial will mainly consist of 3 steps. In step #1 I will design an individual row layout, in step #2 will create a RecyclerView adapter, in step #3 fetch the data from the server and feed it to RecyclerView. The final result should be as below:
What is RecyclerView and why you should use it?
From Android developers documentation
RecyclerView makes it easy to efficiently display large sets of data. You supply the data and define how each item looks, and the RecyclerView library dynamically creates the elements when they’re needed. As the name implies, RecyclerView recycles those individual elements. When an item scrolls off the screen, RecyclerView doesn’t destroy its view. Instead, RecyclerView reuses the view for new items that have scrolled onscreen. This reuse vastly improves performance, improving your app’s responsiveness and reducing power consumption.
Comparing it with ListView, RecyclerView is a much more efficient way of creating a list. You should always use RecyclerView when you want to show a large and dynamic list of data, and ListView when the number of items in the list is fixed and the list’s height is of screen size. RecyclerView recycles the items of the list and it’s given LayoutManager arranges items on the screen. So RecyclerView doesn’t know where to put items on the screen, it just recycles them. From Android developers documentation
The items in your RecyclerView are arranged by a LayoutManager class. The RecyclerView library provides three layout managers, which handle the most common layout situations:
- LinearLayoutManager
- GridLayoutManager
- StaggeredGridLayoutManager
You’ll also need to design the layout of the individual items. You’ll need this layout when you design the view holder, as described in the next section.
Step #1: Layout design
1.1 First, create a new Android project and give it some name.
1.2 In generated activity_main.xml file add the RecyclerView.
<?xml version="1.0" encoding="utf-8"?>
<androidx.constraintlayout.widget.ConstraintLayout xmlns:android="http://schemas.android.com/apk/res/android"
  xmlns:app="http://schemas.android.com/apk/res-auto"
  xmlns:tools="http://schemas.android.com/tools"
  android:layout_width="match_parent"
  android:layout_height="match_parent"
  tools:context=".MainActivity">

  <androidx.recyclerview.widget.RecyclerView
      android:id="@+id/mRecyclerView"
      android:layout_width="match_parent"
      android:layout_height="match_parent"
      app:layout_constraintBottom_toBottomOf="parent"
      app:layout_constraintEnd_toEndOf="parent"
      app:layout_constraintHorizontal_bias="0.49"
      app:layout_constraintStart_toStartOf="parent"
      app:layout_constraintTop_toTopOf="parent" />
</androidx.constraintlayout.widget.ConstraintLayout>
1.3 Then create a new layout file for the layout of an individual item in the list and you can create your custom design if needed. In my case, custom_row.xml is shown below:
<?xml version="1.0" encoding="utf-8"?>
<androidx.constraintlayout.widget.ConstraintLayout xmlns:android="http://schemas.android.com/apk/res/android"
    xmlns:app="http://schemas.android.com/apk/res-auto"
    xmlns:tools="http://schemas.android.com/tools"
    android:layout_marginTop="5dp"
    android:layout_marginBottom="5dp"
    android:layout_marginLeft="5dp"
    android:layout_marginRight="5dp"
    android:layout_width="match_parent"
    android:layout_height="wrap_content">

    <androidx.cardview.widget.CardView
        android:layout_width="match_parent"
        android:layout_height="wrap_content"
        app:cardBackgroundColor="#2B3DA1"
        app:cardCornerRadius="10dp"
        android:elevation="8dp"
        app:layout_constraintBottom_toBottomOf="parent"
        app:layout_constraintEnd_toEndOf="parent"
        app:layout_constraintStart_toStartOf="parent"
        app:layout_constraintTop_toTopOf="parent">

        <androidx.constraintlayout.widget.ConstraintLayout
            android:layout_width="match_parent"
            android:layout_height="wrap_content">

            <TextView
                android:id="@+id/userId"
                android:layout_width="wrap_content"
                android:layout_height="wrap_content"
                android:layout_marginStart="20dp"
                android:layout_marginTop="12dp"
                android:text="TextView"
                android:textColor="#FFEB3B"
                android:textSize="14sp"
                app:layout_constraintStart_toEndOf="@+id/userImage"
                app:layout_constraintTop_toBottomOf="@+id/fullNameText" />

            <TextView
                android:id="@+id/fullNameText"
                android:layout_width="wrap_content"
                android:layout_height="wrap_content"
                android:layout_marginStart="20dp"
                android:layout_marginTop="16dp"
                android:text="TextView"
                android:textColor="#FFFFFF"
                android:textSize="24sp"
                app:layout_constraintStart_toEndOf="@+id/userImage"
                app:layout_constraintTop_toTopOf="parent" />

            <ImageView
                android:id="@+id/userImage"
                android:layout_width="100dp"
                android:layout_height="100dp"
                app:layout_constraintStart_toStartOf="parent"
                app:layout_constraintTop_toTopOf="parent"
                tools:srcCompat="@tools:sample/avatars" />
        </androidx.constraintlayout.widget.ConstraintLayout>
    </androidx.cardview.widget.CardView>
</androidx.constraintlayout.widget.ConstraintLayout>
At this point, we are done with the layout design.
Step #2: Creating RecyclerView Adapter
In the java folder create a new class and call it RecyclerViewAdapter.java
This class should derive from the RecyclerView.Adapter<VH> class and we need to implement its methods, and also create an inner class that derives from the ViewHolder class.
I will paste the code and explain the main parts in the comments.
import android.annotation.SuppressLint;
import android.content.Context;
import android.graphics.Bitmap;
import android.graphics.BitmapFactory;
import android.view.LayoutInflater;
import android.view.View;
import android.view.ViewGroup;
import android.widget.ImageView;
import android.widget.TextView;

import androidx.annotation.NonNull;
import androidx.recyclerview.widget.RecyclerView;

import com.squareup.picasso.Picasso;

import java.util.ArrayList;

public class RecyclerViewAdapter extends RecyclerView.Adapter<RecyclerViewAdapter.MyViewHolder> {
    Context context;
    ArrayList<User> users = new ArrayList<>();
    Bitmap bitmap;
    public RecyclerViewAdapter(Context context, ArrayList<User> users) {
        this.context = context;
        this.users = users; // This is array that contains the list of object, each object is type of User.
    }

    @NonNull
    @Override
    public RecyclerViewAdapter.MyViewHolder onCreateViewHolder(@NonNull ViewGroup parent, int viewType) {
        // In onCreateViewHolder we inflate the layout and give a look to each of our rows
        // as you can see, we referencing custom_row.xml, from the Step #1, in inflate method
        View view = LayoutInflater.from(context).inflate(R.layout.custom_row, parent, false);

        return new RecyclerViewAdapter.MyViewHolder(view);
    }
    @SuppressLint("SetTextI18n")
    @Override
    public void onBindViewHolder(@NonNull RecyclerViewAdapter.MyViewHolder holder, int position) {
        // Assign values to the views we created in the custom_row layout file, based on the position of the recycler view
        // Since RecyclerView reuses rows on Scroll Up/Down, onBindViewHolder gets called each time the row appears
        Picasso.get().load(users.get(position).getUserImage()).into(holder.userImage); // Picasso is a library to easily load images
        holder.userFullName.setText(users.get(position).getTitle() + ". " + users.get(position).getFirstName() + " " + users.get(position).getLastName()); // Setting text to TextView
        holder.userId.setText("My ID: " + users.get(position).getUserId());
    }

    @Override
    public int getItemCount() {
        // RecyclerView wants to know the count of items in the list
        return this.users.size();
    }

    public static class MyViewHolder extends RecyclerView.ViewHolder {
        // RecyclerView has a built-in ViewHolder and this pattern has it's benefits
        // see for details: https://stackoverflow.com/q/21501316/7686275
        ImageView userImage;
        TextView userFullName;
        TextView userId;

        public MyViewHolder(@NonNull View itemView) {
        // grabbing views from our custom_row layout file, similar what we usually do in onCreate method
            super(itemView);
            userImage = itemView.findViewById(R.id.userImage);
            userFullName = itemView.findViewById(R.id.fullNameText);
            userId = itemView.findViewById(R.id.userId);
        }
    }
}
To use Picasso library, add the following to build.gradle:
implementation 'com.squareup.picasso:picasso:2.71828'
Step #3: Fetching data from API
To make HTTP request, I will use Retrofit library. To use Retrofit and to handle JSON format add the following to build.gradle:
  implementation 'com.squareup.retrofit2:retrofit:2.9.0'
  implementation 'com.google.code.gson:gson:2.9.0'
  implementation 'com.squareup.retrofit2:converter-gson:2.9.0'
For the API endpoint, I use dummyapi to get random data for testing. To use this RESTful online fake API, you need to register an account and get the secret app-id, later we need to add it to Header when making a network request. Let’s test this endpoint with Postman and see the returned result.

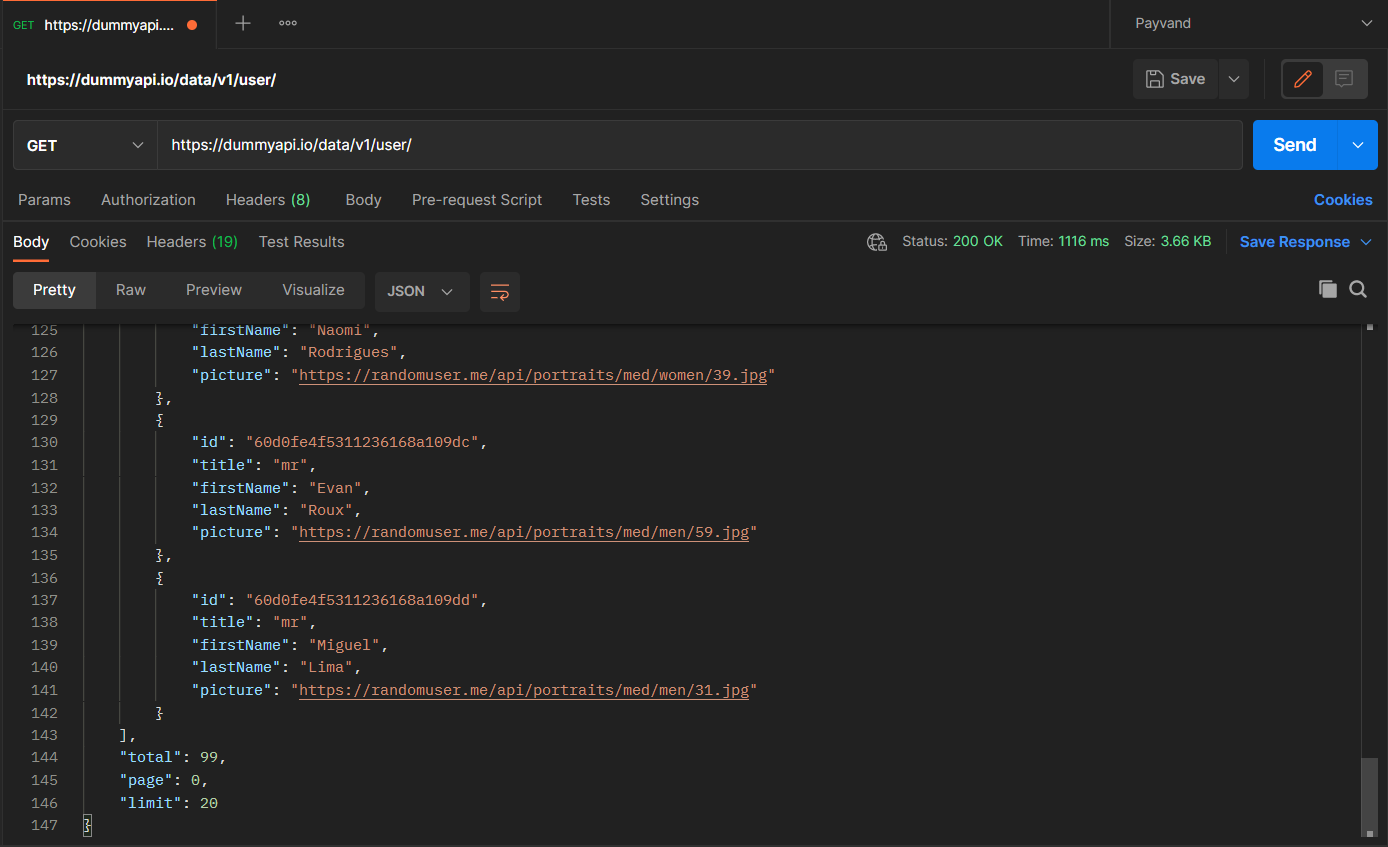
The returned data is in JSON format, one big Json object, that contains Json array data, page, total and limit fields. JSON array contains the multiple objects, each object represent a user and contains user information such as id, title, firstName, lastName, picture, we need to access to these data and display them in RecyclerView. I will use GsonConverterFactory to convert JSON to an equivalent POJO. As you can see, the array with our data is wrapped in one big object, so first create one big wrapper class for this object, in my case UserWrapper.java:
    import java.util.ArrayList;

public class UserWrapper {
    @SerializedName("data") // @SerializedName is Gson annotation, so when serializing and deserializing  an object it maps specified name(in parentheses) with variable name
    ArrayList<User> users; // List of users, where each item is the type of User
    int total;
    int page;
    int limit;

    public UserWrapper(ArrayList<User> users, int total, int page, int limit) {
        this.users = users;
        this.total = total;
        this.page = page;
        this.limit = limit;
    }

    public ArrayList<User> getUsers() {
        return users;
    }

    public int getTotal() {
        return total;
    }

    public int getPage() {
        return page;
    }

    public int getLimit() {
        return limit;
    }
}
Next create a User.java class:
import com.google.gson.annotations.SerializedName;

public class User {
    @SerializedName("id")
    String userId;
    String title;
    String firstName;
    String lastName;
    @SerializedName("picture")
    String userImage;

    public User(String userId, String title, String firstName, String lastName, String userImage) {
        this.userId = userId;
        this.title = title;
        this.firstName = firstName;
        this.lastName = lastName;
        this.userImage = userImage;
    }

    public String getUserId() {
        return userId;
    }

    public String getTitle() {
        return title;
    }

    public String getFirstName() {
        return firstName;
    }

    public String getLastName() {
        return lastName;
    }

    public String getUserImage() {
        return userImage;
    }
}
As you can see, class member variables are the same as returned in the JSON object, but if we change the variable name, inside @SerializedName("") we should define the same name as in JSON so it can match, otherwise we can not convert JSON object to POJO.
Finally, define an interface and then implement its function later in MainActivity.
CallAPI.java
import retrofit2.Call;
import retrofit2.http.GET;
import retrofit2.http.Headers;

public interface CallAPI {
    @Headers({"app-id: your-secret-app-id"})
    @GET("user")
    Call<UserWrapper> getUsers();
}
MainActivity.java
import androidx.appcompat.app.AppCompatActivity;
import androidx.recyclerview.widget.LinearLayoutManager;
import androidx.recyclerview.widget.RecyclerView;
import android.content.Context;
import android.os.Bundle;
import android.util.Log;
import android.widget.Toast;
import java.util.ArrayList;
import retrofit2.Call;
import retrofit2.Callback;
import retrofit2.Response;
import retrofit2.Retrofit;
import retrofit2.converter.gson.GsonConverterFactory;

public class MainActivity extends AppCompatActivity {
    RecyclerView recyclerView;
    ArrayList<User> users;
    private static final String TAG = "MainActivity";

    @Override
    protected void onCreate(Bundle savedInstanceState) {
        super.onCreate(savedInstanceState);
        setContentView(R.layout.activity_main);
        recyclerView = findViewById(R.id.mRecyclerView);
        Context context = this;

        Retrofit retrofit = new Retrofit.Builder()
                            .baseUrl("https://dummyapi.io/data/v1/")
                            .addConverterFactory(GsonConverterFactory.create())
                            .build();

        CallAPI callAPI = retrofit.create(CallAPI.class);

        Call<UserWrapper> call = callAPI.getUsers();

        // asynchronously makes network request
        call.enqueue(new Callback<UserWrapper>() {
            @Override
            public void onResponse(Call<UserWrapper> call, Response<UserWrapper> response) {
                if(!response.isSuccessful()) {
                    Toast.makeText(MainActivity.this, response.code(), Toast.LENGTH_SHORT).show();
                    return;
                }
                Log.d(TAG, String.valueOf(response.body().getUsers().get(0).getFirstName()));
                // Get the data to display
                users = response.body().getUsers();
                // Get the adapter
                RecyclerViewAdapter recyclerViewAdapter = new RecyclerViewAdapter(context, users);
                recyclerView.setAdapter(recyclerViewAdapter);
                recyclerView.setLayoutManager(new LinearLayoutManager(context));
            }

            @Override
            public void onFailure(Call<UserWrapper> call, Throwable t) {
                Toast.makeText(MainActivity.this, t + "", Toast.LENGTH_SHORT).show();
            }
        });

    }
}
That is all to create a RecyclerView.
PS.
As you can see, I’ve used the Picasso library to load images, that is an easy way of doing that since Picasso handles all heavy tasks such as memory caching and asynchronously loads images, etc. At first, I didn’t use this library but tried to directly convert images from URL to bitmap asynchronously and then set it to ImageView in onBindViewHolder, but scrolling usually happens fast, so the images start appearing in a wrong order. In the next post, I will try to load images without using any libraries.